To create a transparent background on a label in VB.NET, you must declare a parent to the label, then adjust the color within your form load code.
Example:
The above label was made transparent (so the background picture could show through) by the following code in the form load method:
lblQuote.Parent = picSpiderman
lblQuote.BackColor = Color.Transparent
As you may have noticed that labels do not have the boolean 'Multiline' property.
You can make a label multiline in two ways:
~by adjusting the parameters for the 'Maximum Size" property, and setting the Autosize property to true. The text will then autofit into the size you specify.
~by setting the Autosize property to false, and adjust the size of the label directly in the form designer.
Showing posts with label Guides. Show all posts
Monday, January 31, 2011
Wednesday, January 12, 2011
How to Create a Basic Excel Ledger in 10 Minutes or Less
Whether you are trying to keep your checkbook balanced, keep an eye on cash flow, or simply trying to organize your finances, Excel is an invaluable tool. Below, I utilize some of Excel’s basic formulas and functionality to create a ledger that could be applied to a variety of purposes.
1. First, create your ‘Title’ row. This will list all the information you will be including. I have included Date, Description, Type, Debit, Credit, and Total in this example.
· Date will store the date of the transaction. For check balancing, the date would be the date on your receipt, not the date you input the information.
· Description will tell the where/why etc. of the purchase/debit.
· Type will allow you to keep track of debit purchases vs. checks vs. direct deposits, etc.
· Debits are transactions that take money OUT of your account. Purchases, etc.
· Credits are transactions that you credit TO your account. Deposits, etc.
· Total: will contain a running total.
Secondly, format your tabs. There are many options for how you set up your tabs. In this example, I put each month in a separate tab. However, if you have relatively few transactions each month, you could separate your tabs by year. Also, if you have multiple accounts you are keeping track of, you could separate them using the tabs.
3. Thirdly, insert your formulas for credit/debit and total. These will be entered in the second row, below your titles.
Use the SUM() formulas for the credit/debit rows:
For the Total row, you will use ‘=credit cell - debit cell’:
4. Fourthly, format and freeze. You will be entering data below your title row(s), therefore it’s important that they stand out! In this example,
· I made all the titles bold (Ctrl+B), with a text size of 12.
· I then made my credit/debit and total text red, with a text size of 12.
· I then froze the top two rows so that now matter how long my data gets, I can always see the titles and totals!
To freeze these rows, first click on ‘View’ on the ribbon. Then click on cell A3. While freezing panes manually, Excel always freezes the rows/columns directly above and/or to the left of the cell you have selected. By selecting cell A3, you will freeze the top to rows. Now, try scrolling. Your title/total rows stay in sight!
You are now ready to begin adding data to your ledger!
Example of Simple Ledger:
Friday, December 31, 2010
Saving a Buck ~ A Poor College Student's Guide
Being a poor college student, I've figured out some handy habits (and some neat tricks!) to save money. With the new year coming, I thought it would be nice to post some that I used most in 2010.
1. Dont Buy Books New: Whether it's text books, reading books, reference books, or the latest bestseller, I've found that buying online is cheaper 99% of the time, and often you can get things good as new!
My favorite site for buying used books is www.half.com
Another good site for buying used books is www.amazon.com
I saved over $100 Buying my text books online for the upcoming semester.
2. Look Around For Student Discounts: Whether you need to buy a new computer, or a piece of software, search around to see what sort of student discounts you can get. Many companies, such as Microsoft and Dell offer substantial discounts for college students. Taking 15-30 minutes to research a little, and set up whatever accounts you need could save you hundreds of dollars on something you were planning to buy anyway!
3. Go Pre-paid on Cell-Phones: I'm a gadget person, and I like the convenience of a cell phone. However, I'm often shocked at how much people pay for their service! (And how little of it they use.) There are MANY pre-paid services available. You should research which ones get best reception in your area. (Ask friends and neighbours what they use...often times bigger companies that offer the long yearly contracts with monthly charges have a pre-paid option!
4. Dont Be a Stickler For Name Brands: When it comes to things like clothing, food, etc. people can often be picky when it comes to brands. However, many times it's just the 'name' you are paying for an no extra quality or product. Try buying canned/boxed food goods at a budget grocery store. (Aldi's is popular in the midwest.) With clothing, it's harder to pick brands that are decent, and not selling their label. I've found, however, that the 25 dollar jeans I buy from the local department store last just as long and serve just as well as the 150 dollar jeans with the fancy label/brand patch on the back from the mall.
If you are super loyal to a particular brand, shop online! I'm always amazed at what I can find at places like eBay, or what sort of deals I can get at the brand's online website!
5. Keep Things in Selling Order: I dont just buy books and other stuff online, I sell stuff too! Often when I'm finished with a course, I resell the book for nearly the price I bought it. Often times with movies, gadgets, it's the same way. (I get bored with my movies and frequently sell them.) Keeping things nice will help you get the most out of it when you decide to sell! Refrain from folding pages, hi-lighting, scrapping dust jackets, losing cases, etc. Take a little time to take care of things, and you will get much more money for them later on.
6. Dont Live By Yourself: Sharing expenses such as rent, electric, internet, etc with a roommate can greatly reduce your month to month expenses. Also splitting up the responsibility of furnishing an apartment can save you hundreds of dollars. But dont always feel like you have to go out and buy things! Ask around, check in on friends who are moving out at the end of a semester. You can find a lot of free stuff people are trying to get rid of! (Just be nice and pass it on to another friend in need when you are done...)
7. Learn to Live Without: Most of what we think we need we can really live without. I have lived without cable television (or any sort of subscription television) for over 9 months, and have saved hundreds of dollars. I still watch many of my favorite shows online via the network's website, or sites such as Hulu.com.
You really dont need every gadget (whether it's an electronic gadget or a kitchen gadget) or every convenience, or every new 'hot' item that comes out.
8. Sweat the Small Stuff: Most of your cash will not get reduced due to large purchases you make infrequently. Most of your cash leaks come from small things you buy on the day to day basis. Keep track sometime just to see where these leaks are, whether it's that caramel mocha you cant live without every day, or the frequent stops to KFC...or the movie rental store.
1. Dont Buy Books New: Whether it's text books, reading books, reference books, or the latest bestseller, I've found that buying online is cheaper 99% of the time, and often you can get things good as new!
My favorite site for buying used books is www.half.com
Another good site for buying used books is www.amazon.com
I saved over $100 Buying my text books online for the upcoming semester.
2. Look Around For Student Discounts: Whether you need to buy a new computer, or a piece of software, search around to see what sort of student discounts you can get. Many companies, such as Microsoft and Dell offer substantial discounts for college students. Taking 15-30 minutes to research a little, and set up whatever accounts you need could save you hundreds of dollars on something you were planning to buy anyway!
3. Go Pre-paid on Cell-Phones: I'm a gadget person, and I like the convenience of a cell phone. However, I'm often shocked at how much people pay for their service! (And how little of it they use.) There are MANY pre-paid services available. You should research which ones get best reception in your area. (Ask friends and neighbours what they use...often times bigger companies that offer the long yearly contracts with monthly charges have a pre-paid option!
4. Dont Be a Stickler For Name Brands: When it comes to things like clothing, food, etc. people can often be picky when it comes to brands. However, many times it's just the 'name' you are paying for an no extra quality or product. Try buying canned/boxed food goods at a budget grocery store. (Aldi's is popular in the midwest.) With clothing, it's harder to pick brands that are decent, and not selling their label. I've found, however, that the 25 dollar jeans I buy from the local department store last just as long and serve just as well as the 150 dollar jeans with the fancy label/brand patch on the back from the mall.
If you are super loyal to a particular brand, shop online! I'm always amazed at what I can find at places like eBay, or what sort of deals I can get at the brand's online website!
5. Keep Things in Selling Order: I dont just buy books and other stuff online, I sell stuff too! Often when I'm finished with a course, I resell the book for nearly the price I bought it. Often times with movies, gadgets, it's the same way. (I get bored with my movies and frequently sell them.) Keeping things nice will help you get the most out of it when you decide to sell! Refrain from folding pages, hi-lighting, scrapping dust jackets, losing cases, etc. Take a little time to take care of things, and you will get much more money for them later on.
6. Dont Live By Yourself: Sharing expenses such as rent, electric, internet, etc with a roommate can greatly reduce your month to month expenses. Also splitting up the responsibility of furnishing an apartment can save you hundreds of dollars. But dont always feel like you have to go out and buy things! Ask around, check in on friends who are moving out at the end of a semester. You can find a lot of free stuff people are trying to get rid of! (Just be nice and pass it on to another friend in need when you are done...)
7. Learn to Live Without: Most of what we think we need we can really live without. I have lived without cable television (or any sort of subscription television) for over 9 months, and have saved hundreds of dollars. I still watch many of my favorite shows online via the network's website, or sites such as Hulu.com.
You really dont need every gadget (whether it's an electronic gadget or a kitchen gadget) or every convenience, or every new 'hot' item that comes out.
8. Sweat the Small Stuff: Most of your cash will not get reduced due to large purchases you make infrequently. Most of your cash leaks come from small things you buy on the day to day basis. Keep track sometime just to see where these leaks are, whether it's that caramel mocha you cant live without every day, or the frequent stops to KFC...or the movie rental store.
Wednesday, December 22, 2010
GUIDE: Creating a Combo Box that is Dependent Upon Another
Summary: At the end of this guide, you will able to manipulate two combo boxes via an Access database, so that when something is selected on one, it limits what's shown in the second.


You will need Microsoft Access 2007 or later, Visual Studio 2010, and some basic coding knowledge as well as some understand of Access.
STEP 1: Open Microsoft Access and create a database named 'School'.
Create two tables: 'Teachers' and 'Classes'.
For the Teachers table create 4 Fields: ID (created automatically), TeachersName, TeachersAddress, and TeachersPhone.
For the Classes table, create 3 Fields: ID, ClassName, and ClassTeacher.
IMPORTANT: For the ClassName, and ClassTeacher fields, in General Field Properties, you will need to select 'Yes (Duplicates Ok)' under 'Indexed'.
The application will not work properly if your fields are not indexed!
Example:
When done, create a few records so that your database is not empty.
I put in three teachers and five classes. (Some teachers will have more then one class!)
Make sure the teachers listed in your Classes table match exactly the teachers listed in your Teachers table under 'TeachersName'.
Example:
STEP 2: Create a New Visual Studio Project Named 'School'. (Visual Studio 2010, Windows Forms)
Add two ComboBoxes to your form:
HINT: If you wish to make your comboboxes read only, go to their properties, and change the 'DropDownStyle' to DropDownList.
STEP 3: Add Database to your Project
On Your Menu Bar go to:
-->Data
----->Add New Data Source
Complete the wizard:
- Make sure you use a Microsoft Access Database File (OLE DB)
- Browse to where you saved the Access Database created in earlier steps.
- Do NOT copy the file to the project.
- Select 'Tables' when choosing Database Objects. You dont need 'Views'.
What it Should Look Like:
STEP 4: Set Up Your Comboboxes
Select your first combobox, go to the properties bar. (If you cant find it, right click the control and select properties and it will pop up.)
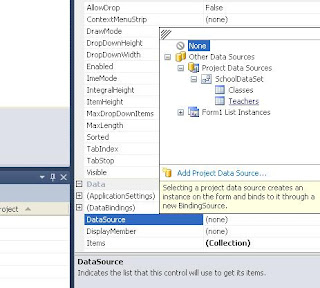
Under the DataSource property, select 'Other Data Sources', 'Project Data Sources', 'SchoolDataSet', 'Teachers'.
Under DisplayMember, select 'TeachersName'.
Visual Studio will automatically create the binding source and the table adapter.
- Do the same thing for the second combobox EXCEPT Select 'Classes' instead of 'Teachers', and select 'ClassName'.
You will now see two Binding Sources, and two TableAdapaters.
If you 'run' your program right now, your two combo boxes will show populated drop down menus! (Go ahead and try.) However, it's just pulling in everything at the moment.
STEP 5: Modifying the SQL
Right click your 'classesTableAdapter' and select 'Edit Queries in DataSet Designer'.
You sill see what will look close to the following:
Right click on the 'ClassesTableAdapter' and select 'Add' ---> Query.
You are going to write a basic SELECT Query.
The code will go as follows:
SELECT ClassName
FROM Classes
WHERE ClassTeacher = ?
Hint: The '?' in this code denotes a variable. If you are using something other then Access, use @ClassTeacher instead of the '?'
Select both 'Fill a DataTable' and 'Return a DataTable'
Name your Method names 'FillByTeacherName' and 'GetDataByTeacherName'
It will now show the methods under your 'ClassesTableAdapter'.
STEP 6: Using Your SQL Code
Double click your first combobox control.
You will notice two lines of code under the Form1_Load method:
this.classesTableAdapter.Fill(this.schoolDataSet.Classes);
this.teachersTableAdapter.Fill(this.schoolDataSet.Teachers);
This is the code that is filling your comboboxes when the page loads.
We are going to modify the classesTableAdapter code as follows:
this.classesTableAdapter.FillByTeacherName(this.schoolDataSet.Classes, comboBox1.Text);
Now, upon first loading, your second combo box will only show classes corresponding with the default teacher that comes up while the page loads.
To make this work when a different teacher is added we will add the SAME line of code into the
'combobox1_SelectedIndexChanged' method. This way, if another teacher is selected, the second combo box will refresh to show the new options.
Now, your comboboxes should show the correct classes for each teacher selected!
Subscribe to:
Posts (Atom)