You will need Microsoft Access 2007 or later, Visual Studio 2010, and some basic coding knowledge as well as some understand of Access.
STEP 1: Open Microsoft Access and create a database named 'School'.

Create two tables: 'Teachers' and 'Classes'.
For the Teachers table create 4 Fields: ID (created automatically), TeachersName, TeachersAddress, and TeachersPhone.
For the Classes table, create 3 Fields: ID, ClassName, and ClassTeacher.
IMPORTANT: For the ClassName, and ClassTeacher fields, in General Field Properties, you will need to select 'Yes (Duplicates Ok)' under 'Indexed'.
The application will not work properly if your fields are not indexed!
Example:

When done, create a few records so that your database is not empty.
I put in three teachers and five classes. (Some teachers will have more then one class!)
Make sure the teachers listed in your Classes table match exactly the teachers listed in your Teachers table under 'TeachersName'.
Example:

STEP 2: Create a New Visual Studio Project Named 'School'. (Visual Studio 2010, Windows Forms)
Add two ComboBoxes to your form:

HINT: If you wish to make your comboboxes read only, go to their properties, and change the 'DropDownStyle' to DropDownList.
STEP 3: Add Database to your Project
On Your Menu Bar go to:
-->Data
----->Add New Data Source
Complete the wizard:
- Make sure you use a Microsoft Access Database File (OLE DB)
- Browse to where you saved the Access Database created in earlier steps.
- Do NOT copy the file to the project.
- Select 'Tables' when choosing Database Objects. You dont need 'Views'.
What it Should Look Like:

STEP 4: Set Up Your Comboboxes
Select your first combobox, go to the properties bar. (If you cant find it, right click the control and select properties and it will pop up.)
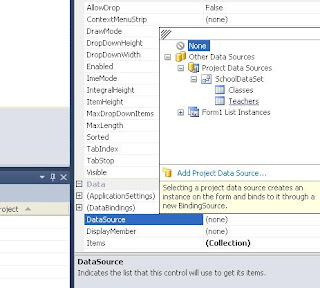
Under the DataSource property, select 'Other Data Sources', 'Project Data Sources', 'SchoolDataSet', 'Teachers'.

Under DisplayMember, select 'TeachersName'.
Visual Studio will automatically create the binding source and the table adapter.

- Do the same thing for the second combobox EXCEPT Select 'Classes' instead of 'Teachers', and select 'ClassName'.
You will now see two Binding Sources, and two TableAdapaters.
If you 'run' your program right now, your two combo boxes will show populated drop down menus! (Go ahead and try.) However, it's just pulling in everything at the moment.

STEP 5: Modifying the SQL
Right click your 'classesTableAdapter' and select 'Edit Queries in DataSet Designer'.
You sill see what will look close to the following:

Right click on the 'ClassesTableAdapter' and select 'Add' ---> Query.
You are going to write a basic SELECT Query.
The code will go as follows:
SELECT ClassName
FROM Classes
WHERE ClassTeacher = ?
Hint: The '?' in this code denotes a variable. If you are using something other then Access, use @ClassTeacher instead of the '?'
Select both 'Fill a DataTable' and 'Return a DataTable'
Name your Method names 'FillByTeacherName' and 'GetDataByTeacherName'
It will now show the methods under your 'ClassesTableAdapter'.
STEP 6: Using Your SQL Code
Double click your first combobox control.
You will notice two lines of code under the Form1_Load method:
this.classesTableAdapter.Fill(this.schoolDataSet.Classes);
this.teachersTableAdapter.Fill(this.schoolDataSet.Teachers);
This is the code that is filling your comboboxes when the page loads.
We are going to modify the classesTableAdapter code as follows:
this.classesTableAdapter.FillByTeacherName(this.schoolDataSet.Classes, comboBox1.Text);
Now, upon first loading, your second combo box will only show classes corresponding with the default teacher that comes up while the page loads.
To make this work when a different teacher is added we will add the SAME line of code into the
'combobox1_SelectedIndexChanged' method. This way, if another teacher is selected, the second combo box will refresh to show the new options.
Now, your comboboxes should show the correct classes for each teacher selected!

Excellent! Thanks so much!!
ReplyDelete